
了解ESLint
![]()
原由是想写一个 繁简体 的业务检查,进而一步一步的了解了 ESLint 这个工具~ ## ESLint的历史 JavaScript 发展历史中,出现了很多 lint 工具,比较有代表性的是以下三款lint工具。
1. JSLint
最早的lint工具,由 Douglas Crockford开发(也是《JavaScript:语言精粹》的作者)。缺点是该工具的语法规则都是预设的,用户无法改变。也就是说,想要使用这个工具,你必须确保自己能接受它的所有规则。
2. JSHint
JSHint 是由 Anton Kovalyov 基于 JSLint 开发的开源项目,显著的特点就是允许用户自定义自己的语法规则,加持上开源社区的驱动,发展十分迅速。由于是基于 JSLint 开发,原有的一些问题也继承下来了,比如:不易扩展,不易直接根据报错定位到具体的规则配置等。
3. ESLint
ESLint是由 Nicholas C. Zakas (《JavaScript 高级程序设计》作者) 在2013年开始开发的,它的初衷就是为了能让开发者能自定义自己的 lint rules,它提供了一套完善的插件系统,可以自由的扩展,动态的加载配置,同时能方便的根据报错定位到具体的规则配置。ESLint的诞生并不是 Zakas 在重复造一个轮子,而是他在业务开发中需要新增一条规则,但是 JSHint 无法提供支持,于是他就结合 JSHint 和 JSCS (AST的方式进行规则检测) 写出来了 ESLint。
早期的 ESLint 并没有大火,因为需要将源代码转成 AST,运行速度上输给了 JSHint,并且 JSHint 当时已经有了完整的生态(编辑器的支持)。真正让 ESLint 大火是因为 ES6 的出现。
ES6 发布后,因为新增了很多语法,JSHint 短期内无法提供支持,而 ESLint 只需要有合适的解析器就能够进行 lint 检查。这时 Babel 为 ESLint 提供了支持,开发了 babel-eslint,让 ESLint 成为最快支持 ES6 语法的 lint 工具。
使用ESLint
ESLint 的用法包含两部分:通过配置文件配置 lint 规则;通过命令行执行 lint 。
配置eslint
通过 eslint --init 做出各种选择是最常见的 eslint 配置方式: 1
2
3
4
5
6
7 eslint --init
√ How would you like to use ESLint? · problems
√ What type of modules does your project use? · commonjs
√ Which framework does your project use? · none
√ Does your project use TypeScript? · No / Yes
√ Where does your code run? · browser
√ What format do you want your config file to be in? · JavaScript.eslintrc.js 文件。 1
2
3
4
5
6
7
8
9
10
11
12
13
14/* .eslintrc.js */
module.exports = {
"env": {
"browser": true,
"commonjs": true,
"es2021": true
},
"extends": "eslint:recommended",
"parserOptions": {
"ecmaVersion": 12
},
"rules": {
}
};
然后通过 命令行 的交互就能去检查对应的 js 文件了。 1
eslint demo.js
创建 ESLint 自定义规则
1. npm 安装
根据 ESLint 的官方指南,我们需要 yeoman 和 generator-eslint 来构建插件的脚手架代码。
1 | npm install -g yo generator-eslint |
2. 创建文件夹
1 | mkdir eslint-plugin-demo |
3. 初始化项目结构
1 | yo eslint:plugin |
会进入对应的命令行交互流程,流程结束生成 ESLint 插件项目的目录结构
1 | ? What is your name? hddhyq |
4. 创建规则
1 | yo eslint:rule |
创建规则命令行交互: 1
2
3
4
5
6
7
8
9
10? What is your name? hddhyq
? Where will this rule be published? (Use arrow keys) # 这个规则将在哪里发布
ESLint Core # 官方的核心规则 (目前有200多条规则)
❯ ESLint Plugin # 选择 ESLint 插件
? What is the rule ID? no-wareware
? Type a short description of this rule: 禁止使用~~转换数字
? Type a short example of the code that will fail: var a = ~~100 # 测试代码
create docs\rules\no-wareware.md # 使用文档
create lib\rules\no-wareware.js # 校验文件
create tests\lib\rules\no-wareware.js # 测试文件
ESLint 如何验证规则
Lint 是基于静态代码进行分析,对于 ESLint 来说,核心功能就是对 rule 及其配置,利用 Lint 分析源码。这里就需要介绍到 AST(抽象语法树) ,相信大家对它一定都用一定的了解,像Babel,Webpack,UglifyJS 等都使用到了 AST 。
关于 AST
ESLint 使用 Espree 来解析我们的 JS 语句,来生成抽象语法树。我们可以使用AST explorer ,方便查看一段代码被解析成 AST 后的样子。
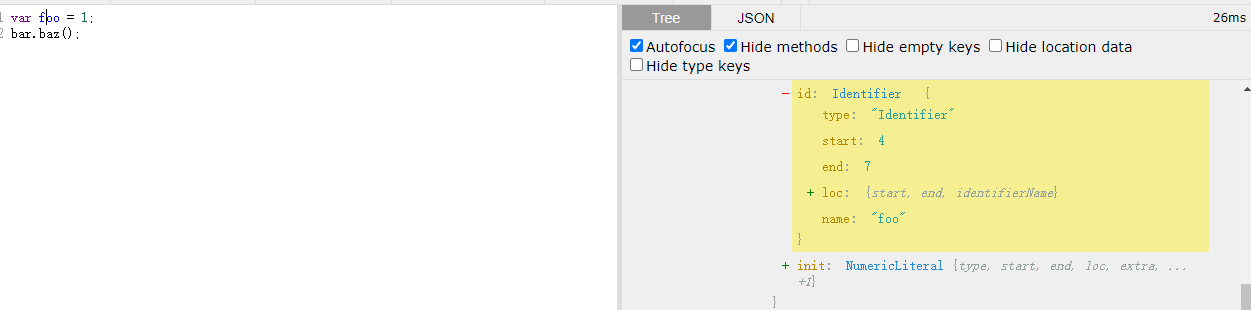
从上图可以看出,我们鼠标在右侧选中某个值,左侧对应的区域也会高亮展示。就像 CSS Selectors 一样,右侧被选中的项,我们称作 AST selectors 。
通过 AST selectors 我们可以快速的找到 静态代码中的内容 。 ### 单条 rule 如何工作? 这里看一下,我们自定义的规则 "eslint-plugin-demo/no-wareware": "error" 。源码如下:
1 | module.exports = { |
可以看到,一条 rule 就是一个 node 模块,主要由 meta 和 create 两部分组成,
meta代表了这条规则的元数据,比如类别,文档,可接受的参数schema等,官方文档对其有详细描述。create主要表达了这条 rule 具体会怎么分析处理代码。
上面的代码,在运行到 UnaryExpression 会判断它的操作符是否为"",并判断是否下一个操作符是否也为""。如果匹配到,就会抛出错误。
拓展,关于 selector:exit
- ESLint 的 traverser 用到了递归遍历,是一个由外向内再向外的过程,
:exit相当于添加了一重额外的回调,让我们对静态代码有了更多的控制。 - ESLint 好像也能帮我们找到永远不会执行的语句,如:no-unreachable。ESLint 会通过 code path analysis 完成这一步骤。
rule 如何组合生效?
我们由多种途径传递 rule。
- 配置文件中 rule。
- 文件内部注释评论的 rule,这部分 rule,被称作 direcive rule。
ESLint 在获取到了所有需要对单个文件应用的规则之后,接下来就是也该多重遍历的过程。源码位于runRules 函数
1 | // 节选源码 |
- 遍历依据源码生成的 AST ,将每一个 node 传入 nodeQueue 队列中,每个会被传入两次。
- 遍历所有将被应用的规则,为规则中所有的选择器添加监听事件,在触发时执行,将问题 push 到
lintingProblems中。 - 遍历第一步获取到的 nodeQueue,触发其中包含的事件。
- 返回 lintingProblems。
这里用到了 node 的事件驱动机制,遍历的同时触发监听事件。
Plugin
plugin 大致可以两重概念:
- 在 ESLint 配置项的字段,如
plugins: ["demo"],调用我们上面的自定义 plugin 。 - 社区封装的 ESLint plugin,像 eslint-plugin-vue 这样 npm 模块。
plugin 可以看作第三方规则的集合,ESLint 本身只会去支持标准的 ECMAScript 语法,如果我们需要在 Vue 中使用ESLint ,我们需要自己去定义一些规则,这样就有了 eslint-plugin-vue。
plugin的配置规则和ESLint配置文件很相似,关于如何去配置 plugin,我们可以通过 working-with-plugins 去查看。
这里我们特别需要关注的是 plugin 的两种用法。
- 在
extends中使用,plugin有自己的命名空间,可通过"extends": ["plugin: myPlugin/myConfig"]引入plugin 的某类规则,具体规则是由plugin中配置的。 - 在
plugin中使用,如添加配置plugin: ["vue"],需要在 rule 中声明需要配置的 eslint-plugin-vue 提供的规则。
自定义Parser
plugin 的应用已经大大的增加了 ESLint 的使用规则,但是如果我们需要对一些 JS 的方言添加 Lint 在怎么办呢?
只需要满足 ESLint 的规定,便能使 ESLint 支持我们的自定义 parser 。
在社区中,我们常见的 parser 有
自定义的 parser 使用方法如下 1
2
3{
"parser": "./path/to/awesome-custom-parser.js"
}
业务中的使用场景
除了上面的类似检查 ~~ 的单纯检查编码的场景,还可以将业务中总结的业务规范通过 自定义 ESLint 的方式提示开发者,这对于团队开发,代码维护,确保业务的安全上线都有很大的帮助。
更多的应用场景:
- 代码中不能使用 OSS 地址的静态资源路径,应该使用 CDN 地址的资源路径。
- 代码中,工具类 utility 通过统一的路径引入。
- 保证 API 的使用规范。
- ...
参考
- introduce ESLint by Nicholas C. Zakas
- JS Linter 进化史
- ESLint 工作原理探讨
- ESLint 架构
拓展
- 本文标题:了解ESLint
- 本文作者:hddhyq
- 本文链接:https://hddhyq.github.io/2021/02/27/know-eslint/
- 版权声明:本博客所有文章除特别声明外,均采用 CC BY-NC-SA 4.0 许可协议。转载请注明出处!