CircleCI简单概念

又是关于前两个星期零零星星看的文章的总结,主要关于 CircleCI 。首先是CircleCI的介绍,然后下一篇文字介绍下部署一个vue项目到gh-pages的步骤。

概念

导航,概念 ## 步骤(Steps)

步骤一般是可执行的命令组成的。

1
2
3
4
5
6
7
8
9
10
#...
steps:
- checkout # Special step to checkout your source code
- run: # Run step to execute commands, see
# circleci.com/docs/2.0/configuration-reference/#run
name: Running tests
command: make test # executable command run in
# non-login shell with /bin/bash -eo pipefail option
# by default.
#...

镜像(Image)

指定确定的docker容器。

1
2
3
4
5
6
7
8
9
10
11
12
13
14
15
16
17
18
19
20
21
22
23
24
25
26
27
28
version 2
jobs:
build1: # job name
docker: # Specifies the primary container image,
# see circleci.com/docs/2.0/circleci-images/ for
# the list of pre-built CircleCI images on dockerhub.
- image: buildpack-deps:trusty

- image: postgres:9.4.1 # Specifies the database image
# for the secondary or service container run in a common
# network where ports exposed on the primary container are
# available on localhost.
environment: # Specifies the POSTGRES_USER authentication
# environment variable, see circleci.com/docs/2.0/env-vars/
# for instructions about using environment variables.
POSTGRES_USER: root
...
build2:
machine: # Specifies a machine image that uses
# an Ubuntu version 14.04 image with Docker 17.06.1-ce
# and docker-compose 1.14.0, follow CircleCI Discuss Announcements
# for new image releases.
image: circleci/classic:201708-01
...
build3:
macos: # Specifies a macOS virtual machine with Xcode version 9.0
xcode: "9.0"
...

任务(Jobs)

任务是步骤的集合,单个任务必须指定dockermachinemacos

缓存

可以缓存诸如项目中源代码的依赖的文件或者目录。

1
2
3
4
5
6
7
8
9
10
11
12
13
14
15
16
17
18
19
20
21
22
23
24
25
version: 2
jobs:
build1:
docker: # Each job requires specifying an executor
# (either docker, macos, or machine), see
# circleci.com/docs/2.0/executor-types/ for a comparison
# and more examples.
- image: circleci/ruby:2.4-node
- image: circleci/postgres:9.4.12-alpine
steps:
- checkout
- save_cache: # Caches dependencies with a cache key
# template for an environment variable,
# see circleci.com/docs/2.0/caching/
key: v1-repo-{{ .Environment.CIRCLE_SHA1 }}
paths:
- ~/circleci-demo-workflows

build2:
docker:
- image: circleci/ruby:2.4-node
- image: circleci/postgres:9.4.12-alpine
steps:
- restore_cache: # Restores the cached dependency.
key: v1-repo-{{ .Environment.CIRCLE_SHA1 }}

工作流

工作流定义了一系列的任务和他们的运行顺序。它可以使任务并行,穿行和按计划或者手动控制运行。

1
2
3
4
5
6
7
8
9
10
11
12
13
14
15
16
17
18
19
20
21
22
23
24
25
26
27
28
29
30
31
32
33
34
35
36
37
38
39
40
41
42
43
44
45
46
47
version: 2
jobs:
build1:
docker:
- image: circleci/ruby:2.4-node
- image: circleci/postgres:9.4.12-alpine
steps:
- checkout
- save_cache: # Caches dependencies with a cache key
key: v1-repo-{{ .Environment.CIRCLE_SHA1 }}
paths:
- ~/circleci-demo-workflows

build2:
docker:
- image: circleci/ruby:2.4-node
- image: circleci/postgres:9.4.12-alpine
steps:
- restore_cache: # Restores the cached dependency.
key: v1-repo-{{ .Environment.CIRCLE_SHA1 }}
- run:
name: Running tests
command: make test
build3:
docker:
- image: circleci/ruby:2.4-node
- image: circleci/postgres:9.4.12-alpine
steps:
- restore_cache: # Restores the cached dependency.
key: v1-repo-{{ .Environment.CIRCLE_SHA1 }}
- run:
name: Precompile assets
command: bundle exec rake assets:precompile
...
workflows:
version: 2
build_and_test: # name of your workflow
jobs:
- build1
- build2:
requires:
- build1 # wait for build1 job to complete successfully before starting
# see circleci.com/docs/2.0/workflows/ for more examples.
- build3:
requires:
- build1 # wait for build1 job to complete successfully before starting
# run build2 and build3 in parallel to save time.

工作区域和文件

Artifacts, Workspaces,Caches的讨论看 Persisting Data in Workflows: When to Use Caching, Artifacts, and Workspaces

也可以看看 Jobs and Steps来查看更多。

工作流

要通过更快的反馈,更短的重运行时间和更有效的资源使用来提高软件开发的速度,请配置工作流程。这个文档描述了工作流程的特性而且提供以下章节的用例:

  • 概述
  • 工作流配置案例
  • 手动控制持久工作流
  • 有序化一个工作流程
  • 使用上下文来过滤你的工作流程
  • 使用工作区来在任务重分享数据
  • 重运行失败的任务
  • 故障排除

概述

你能做的有:

  • 通过实时状态反馈来运行和解决任务中的问题
  • 将需要定期执行的工作流按计划执行
  • 通过多个并行任务来进行有效的版本测试
  • 快速部署到多个不同的平台

平行任务

在底部添加workflows,通过build_and_test 可看Sample Parallel Workflow config

顺序任务

需要添加require关键字。

1
2
3
4
5
6
7
8
9
10
11
12
13
14
workflows:
version: 2
build-test-and-deploy:
jobs:
- build
- test1:
requires:
- build
- test2:
requires:
- test1
- deploy:
requires:
- test2

扇出/扇入工作流示例

下面视图扇出一组工作流,然后扇入来运行公共的部署任务: Sample Fan-in/Fan-out Workflow config

1
2
3
4
5
6
7
8
9
10
11
12
13
14
15
16
17
18
19
20
21
22
23
workflows:
version: 2
build_accept_deploy:
jobs:
- build
- acceptance_test_1:
requires:
- build
- acceptance_test_2:
requires:
- build
- acceptance_test_3:
requires:
- build
- acceptance_test_4:
requires:
- build
- deploy:
requires:
- acceptance_test_1
- acceptance_test_2
- acceptance_test_3
- acceptance_test_4

通过手动批准来控制工作流

工作流可以设置为需要手动批准再进行下一个任务。任何有权利访问代码库的人都可以继续工作流。为了做到这一点,在任务列表中添加type: approval

1
2
3
4
5
6
7
8
9
10
11
12
13
14
15
16
17
18
19
20
workflows:
version: 2
build-test-and-approval-deploy:
jobs:
- build # your custom job from your config, that builds your code
- test1: # your custom job; runs test suite 1
requires: # test1 will not run until the `build` job is completed.
- build
- test2: # another custom job; runs test suite 2,
requires: # test2 is dependent on the succes of job `test1`
- test1
- hold: # <<< A job that will require manual approval in the CircleCI web application.
type: approval # <<< This key-value pair will set your workflow to a status of "On Hold"
requires: # We only run the "hold" job when test2 has succeeded
- test2
# On approval of the `hold` job, any successive job that requires the `hold` job will run.
# In this case, a user is manually triggering the deploy job.
- deploy:
requires:
- hold

上例中举例,就是在最后需要手动批准hold才能进行部署任务。

下面也有一些我们在工作流中需要注意的地方: * approval是仅在workflow下job的一个特殊类型。 * hold任务必须确保不再其他任务中重名。 * 这代表着,你的个人定制任务,像build或者test1在上例中不能给type: approval键 * 任务的名字随意。 * 在手动任务之后的任务都需要添加require:来依赖这个手动任务。 * 任务按顺序执行,直到碰到了type: approval

下面展示一下截图

安排工作流程

手动书写每个分支的任务和流程十分的低效和耗时,所以我们能够在确定不同分支的运行时间。

在夜晚执行的任务

默认工作流的触发依赖于每次git push,为了按照计划执行工作流,我们可以添加triggers键来特殊化工作调度。

下面的例子中,我们将运行一个旨在夜晚12点后运行的工作流。使用POSIX crontab语法指定cron键。crontab man page来查看基本语法。

1
2
3
4
5
6
7
8
9
10
11
12
13
14
15
16
17
workflows:
version: 2
commit:
jobs:
- test
- deploy
nightly:
triggers:
- schedule:
cron: "0 0 * * *"
filters:
branches:
only:
- master
- beta
jobs:
- coverage

制定有效的计划

一个有效的计划,需要cron键和filter键。cron的键值必须是一个有效的vaild crontab entry键。

使用任务上下文来分享环境变量

下面的例子展示了如何使用上下文来在一个工作流的四个平行任务中分享环境变量。

1
2
3
4
5
6
7
8
9
10
11
12
13
14
15
16
workflows:
version: 2
build-test-and-deploy:
jobs:
- build
- test1:
requires:
- build
context: org-global
- test2:
requires:
- test1
context: org-global
- deploy:
requires:
- test2

分支级别的任务执行

下面的例子会展示,如何在三个分支配置任务流。工作流会在忽略在任务底下的分支键,如果想在工作流中添加任务级别的分支,需要移除任务级别的分支,转而描述它。

1
2
3
4
5
6
7
8
9
10
11
12
13
14
15
16
17
18
workflows:
version: 2
dev_stage_pre-prod:
jobs:
- test_dev:
filters: # using regex filters requires the entire branch to match
branches:
only: # only branches matching the below regex filters will run
- dev
- /user-.*/
- test_stage:
filters:
branches:
only: stage
- test_pre-prod:
filters:
branches:
only: /pre-prod(?:-.+)?$/

执行Git Tag的工作流

circleci并不会主动执行 git tags 分支,除非你定义特定的tags过滤器。如果一个任务直接间接的需要另外一个任务,你必须指定正则表达式来制定任务的tag filter。轻量级和注释的tag都被支持。

下面的例子展示了两种tag分支方式: 1. untagged-build为所有分支运行build任务。 2. tagged-build为所有分支和带v的标签运行build

1
2
3
4
5
6
7
8
9
10
11
workflows:
version: 2
untagged-build:
jobs:
- build
tagged-build:
jobs:
- build:
filters:
tags:
only: /^v.*/

下面展示的三个例子就是workflow的步骤 * build跑所有分支和有config-test名称的tags。 * test跑所有分支和有config-test名称的tags。 * deploy不跑分支只跑有config-test的任务。

1
2
3
4
5
6
7
8
9
10
11
12
13
14
15
16
17
18
19
20
21
22
workflows:
version: 2
build-test-deploy:
jobs:
- build:
filters: # required since `test` has tag filters AND requires `build`
tags:
only: /^config-test.*/
- test:
requires:
- build
filters: # required since `deploy` has tag filters AND requires `test`
tags:
only: /^config-test.*/
- deploy:
requires:
- test
filters:
tags:
only: /^config-test.*/
branches:
ignore: /.*/

需要注意的是,GitHub的分支单词只能承受5MB和少于三个标签。意味着,如果你一次添加多个标签,那么CircleCi也许不会接受他们全部。

使用工作区来在任务中分享数据

每个工作流都有一个相关的工作区,能够将文件转换为下游任务的工作流流程。工作区仅用来添加数据的储存。任务可以在工作区中持久化数据。此配置归档数据并在容器外存储中创建新层。下游文件可以通过文件系统的容器访问工作区。附加工作区会根据工作流程中上游作业的顺序下载并解压缩每个层。

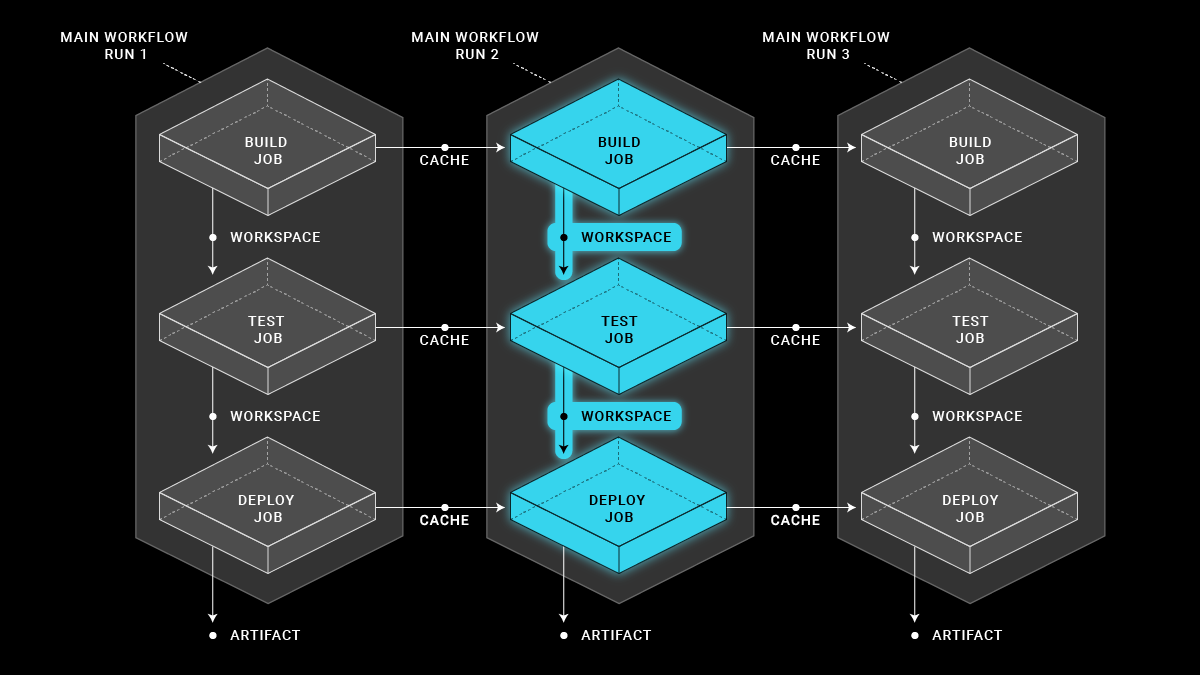
使用工作区来传递当前层及下层需要的特殊数据。工作流程的任务运行于多个分支,也许需要将数据分享到工作区中。工作区也可以用于在测试容器中比较数据。

举个例子,Scala项目一般需要打来的CPU计算来完成build任务。相比之下,Scala测试任务不是CPU密集型的而且可以很好的跨容器并行化。使用一个大的容器来build任务,然后保存编译好的数据到工作区,能够让测试容器中使用到编译好的数据。

第二个例子就是,一个能编译的项目,使用build好的包,然后保存到工作区。build任务扇出到的分支能够并行的使用打包好的文件。

为了将一个任务中的数据持久化,并使它能够在其他的任务中使用。我们需要使用persist_to_workspace键。文件和目录中的带有paths的属性使用persist_to_workspace会被上传到工作区中的临时目录中,相对于root键定义的目录。文件和目录在这时上传之后,就可以在相应的子任务中使用。

配置任务接收存储的数据,需要用到attach_workspace键。下面的例子中的config.yml文件中,定义了下游文件使用了流任务中的两个任务。这里的工作流是顺序的。所以downstream需要等到流文件结束才能开始。

1
2
3
4
5
6
7
8
9
10
11
12
13
14
15
16
17
18
19
20
21
22
23
24
25
26
27
28
29
30
31
32
33
34
35
36
37
38
39
40
41
42
43
44
45
46
47
48
49
50
51
# Note that the following stanza uses CircleCI 2.1 to make use of a Reusable Executor
# This allows defining a docker image to reuse across jobs.
# visit https://circleci.com/docs/2.0/reusing-config/#authoring-reusable-executors to learn more.

version: 2.1

executors:
my-executor:
docker:
- image: buildpack-deps:jessie
working_directory: /tmp

jobs:
flow:
executor: my-executor
steps:
- run: mkdir -p workspace
- run: echo "Hello, world!" > workspace/echo-output

# Persist the specified paths (workspace/echo-output) into the workspace for use in downstream job.
- persist_to_workspace:
# Must be an absolute path, or relative path from working_directory. This is a directory on the container which is
# taken to be the root directory of the workspace.
root: workspace
# Must be relative path from root
paths:
- echo-output

downstream:
executor: my-executor
steps:
- attach_workspace:
# Must be absolute path or relative path from working_directory
at: /tmp/workspace

- run: |
if [[ `cat /tmp/workspace/echo-output` == "Hello, world!" ]]; then
echo "It worked!";
else
echo "Nope!"; exit 1
fi

workflows:
version: 2.1

btd:
jobs:
- flow
- downstream:
requires:
- flow

可通过Persisting Data in Workflows: When to Use Caching, Artifacts, and Workspaces查看更多的关于使用workspaces, caching, and artifacts。
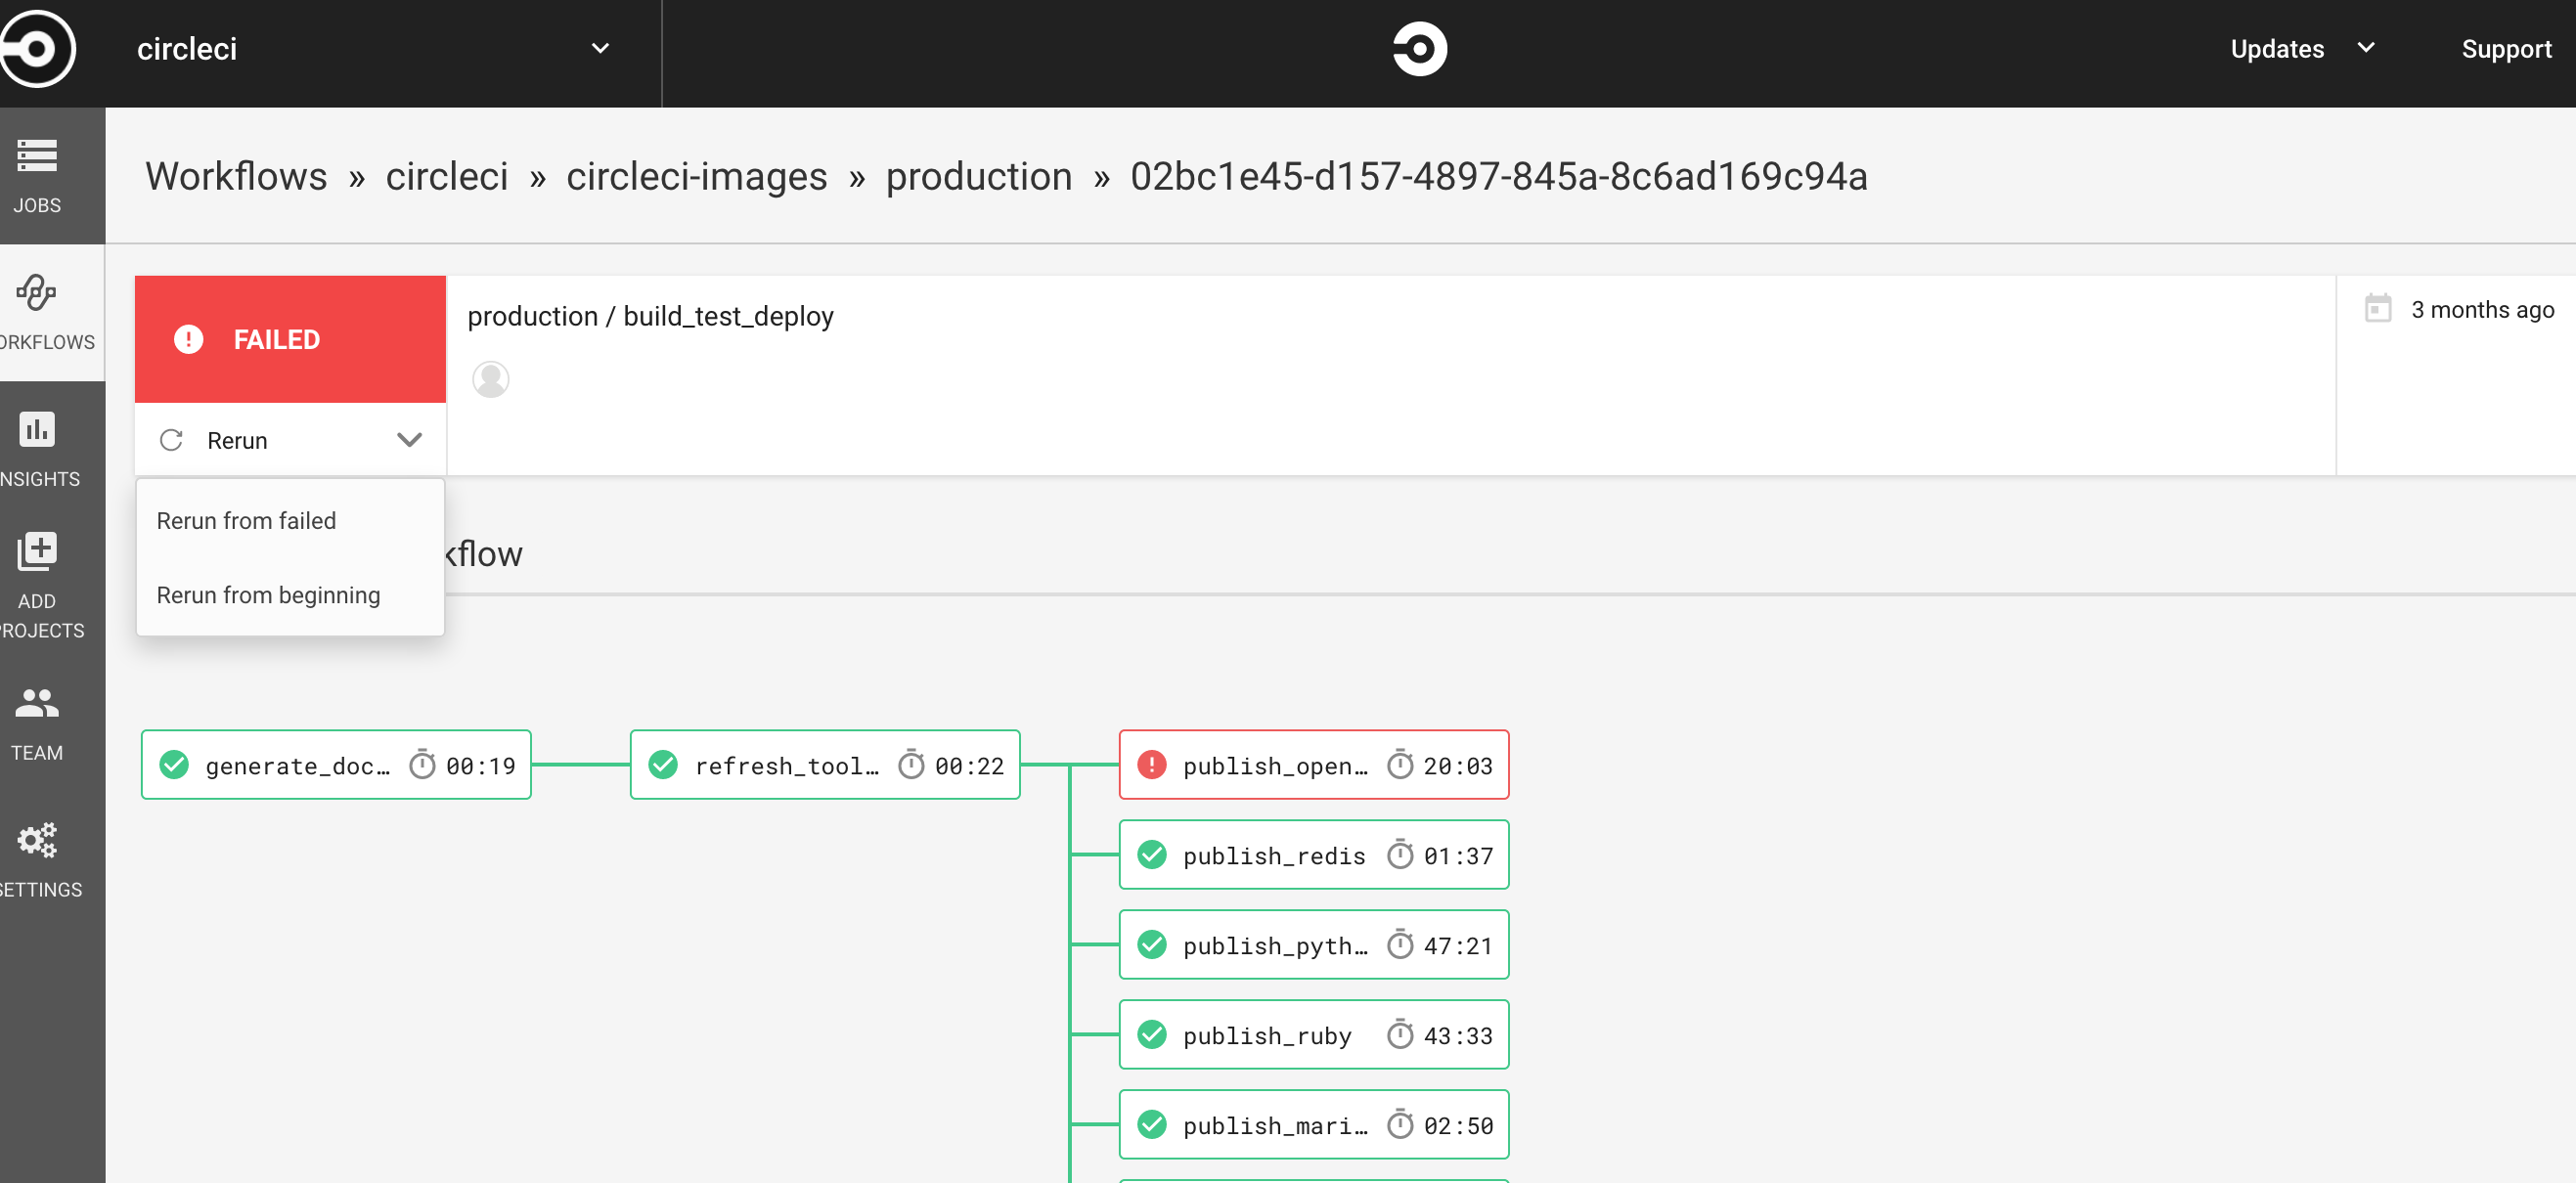
重运行失败的任务

当你使用工作流的时候,你能增加你快速响应失败任务的能力。为了重运行工作流中失败的任务。你可以在Workflows中选择相应的工作流,选择Rerun按钮。

return

故障排除

这个章节讨论一些工作流中常见的问题。

工作流没有开始

如果你创建和修改了工作流的配置,如果你没看见新的任务,很有可能是你的配置文件config.yml出现了问题。

通常情况下,如果你没看见你的工作流正常触发,配置错误阻止了工作流的启动。作为结论,工作流没有启动任何一个任务。

在设置工作流程时,您当前必须检查CircleCI应用程序的工作流程页面(而不是作业页面)以查看配置错误。

工作流等待GitHub的状态。

配置circleci

CircleCI 镜像

  • https://hub.docker.com/r/circleci/
  • https://github.com/circleci/circleci-images
  • https://github.com/circleci-public/circleci-dockerfiles

最佳实践

最好确定好版本号,不适用last版本。Debian系统需要在尾部添加上-jessie-stretch

使用镜像的便签来标注语言和操作系统

circleci/golang:1.8.6-jessie

注意: 如果没有固定标签,Docker将会使用latest标签。latest引用的是最有一个稳定版本的镜像。这样的镜像时十分不稳定的,所以最佳时间推荐使用稳定的镜像。

使用Docker镜像ID将图像固定到固定版本

每一个Docker都有唯一的ID。

1
sha256:df1808e61a9c32d0ec110960fed213ab2339451ca88941e9be01a03adc98396e

如何找到最近的镜像的ID 1. 在CircleCI应用程序中,转到最后使用该镜像的构建中。 2. 在Test Summary栏中,点击Spin up environment。 3. 在日志输出中,找到镜像的摘要。 4. 将图像ID添加到图像名称,如下所示

1
circleci/ruby@sha256:df1808e61a9c32d0ec110960fed213ab2339451ca88941e9be01a03adc98396e

镜像类型

CircleCi为了便利,提供了两种镜像。语言镜像和服务器镜像。所有的镜像都需要添加circleci用户来作为系统用户。

镜像语言

  • Android
  • Clojure
  • Elixir
  • Go (Golang)
  • JRuby
  • Node.js
  • OpenJDK (Java)
  • PHP
  • Python
  • Ruby
  • Rust

语言镜像变体

Circleci维持了一些语言变量的变体镜像。要使用这些变种将以下后缀之一添加到图像标记的末尾。

  • -node 包括用于多语言应用程序的Node.js.
  • -browsers 包括Chrome,Firefox,Java 8和Geckodriver.
  • -browsers-legacy 包括Chrome,Firefox,Java 8和PhantomJS.
  • -node-browsers 结合了-node-browsers变体.
  • -node-browsers-legacy 结合了-node-browsers-legacy变体.

服务器镜像

服务镜像是数据库等服务的便利镜像。这些景象应该在语言镜像之后列出,使之成为二级镜像。

  • buildpack-deps
  • DynamoDB
  • MariaDB
  • MongoDB
  • MySQL
  • PostgreSQL
  • Redis

服务镜像变体

使用RAM加速需要添加-ram后缀。举例,circleci/postgres:9.5-postgis => circleci/postgres:9.5-postgis-ram

预安装工具

除了安卓镜像,其他都包括下列预安装工具,通过apt-get安装。

  • bzip2
  • ca-certificates
  • curl
  • git
  • gnupg
  • gzip
  • locales
  • mercurial
  • net-tools
  • netcat
  • openssh-client
  • parallel
  • sudo
  • tar
  • unzip
  • wget
  • xvfb
  • zip
# 相关文章
  1.CircleCI实践gh-pages部署

评论

加载中,最新评论有1分钟延迟...